"Flying Dutchman" - Ghost Ship - OREL Russian Paper Model Build

Back again :) Okay, so far, so good I guess. I can definitely say that the written instructions are not that great, and they do leave out some major assemblies of the model. The images are decent though, thank God!

The deck cannons are made up from several parts. I found it easier to use different color pens to circle the common numbered areas. Prior to that, my eyes were going crazy trying to find the groupings of the parts.

001.JPG


A nice new blade is ideal to separate the parts from the card. In some cases, I had to turn over the sheet and cut from the back too just to make a nice clean job of it.

002.JPG


These are the main parts for each of the cannons. There are many different sizes so be sure to mark them with pencil on the base and inside.

003.JPG


004.JPG


Clean the edges up with a nail sandpaper file and or a soft sandpaper block.

005.JPG


The cannons are in place. It is super-easy to get the direction of the sides wrong, so be careful, and take your time. I had to re-make a couple of the cannons because I had the sides back to front. Thankfully, I hadn't attached them to the deck yet.

006.JPG


I found out later that there is an additional skin part that goes on the front of the cannon that gives a gray color (see further down the images below). I had to add them after the cannons were glued to the deck, but it would be easier to do it before.

007.JPG


The deck is printed on very thin paper which is nice to cut.

Please be aware that the majority of the ship has to be cutout from the parts. If you opt for the laser cut optional add-on pack, that is just for the main superstructure and is not colored!

008.JPG


Its better to use spray glue for attaching the decking skins to the deck. This will help to avoid warping of the card. Oh, and you need to brush-up on your Roman Numerals as these are used for the structural parts. As in I II, III, IV, V, and so on.

009.JPG


I used Elmers spray glue as it comes in a small can, and I don't think I will need too much overall.

010.JPG


Look at those beautiful lattice covers. You should note too that for every card part with the laser pack option, that there is a corresponding color skin part that must be attached.

011.JPG


012.JPG


013.JPG
014.JPG


015.JPG


016.JPG


017.JPG


018.JPG


019.JPG


020.JPG
 
Impressive! If you ever so lightly score the lines where the wood panels meet with a dull tool you will get an additional 3D effect, as if you have used single panels. ;)
 
Superb job skinning the hull. The fiddly bits are coming out just as nice! :)
 
  • Like
Reactions: mtrappett
:)
The grating covers are pictured below. The laser cutting looks nice and clean. I decided to color the area black underneath the lattice to give the feeling of depth below the ship.

021.JPG


The instructions are a bit hard to follow, but this series of steps seems to work well. Its easier to place the detail prior to gluing the deck in place I feel.

022.JPG


I added the light panel-lines later in the build but it would have been easier to do it before gluing the details in place.

023.JPG


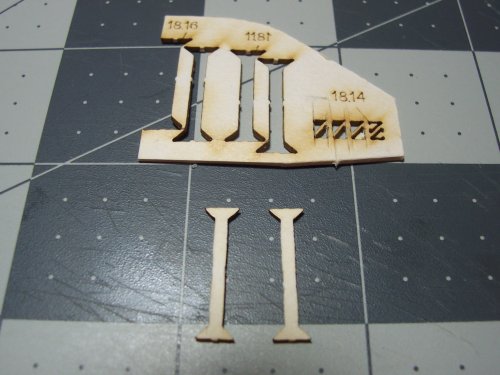
18.12 and 18.17 are required to build the deck supports. Be careful because they have a top and bottom to them! The square section shows where the foot piece is to be placed.

024.JPG


These are the front facing skins for the below decks cannons. These parts make sure that you don't just see plain card color through the cannon ports. The instructions don't make it clear that these need to be fitted but they would be easier to add when making the cannons. There are actually 5 parts to make 1 cannon base.

- Left Side
-Right Side
- Base
- Front
- Front Skin

There are 26 cannons in total on the lower decks. That is 26 x 5 parts, equals 130 pieces in total. Quite a lot of cutting and assembling :)

025.JPG


Okay, the completed bases for the lower cannons.

026.JPG


027.JPG


More deck pieces.

028.JPG


These are the deck supports. Both layers must be glued together to give a thickness of 2.0mm.

029.JPG


Here is the first one glued together.

030.JPG


The first deck support glued in place.

031.JPG


Make sure to glue the skin parts the correct way up.

032.JPG


Complete with skins in place.

033.JPG


034.JPG


035.JPG


Some micro-surgery required here to make the small feet for the desk supports.

036.JPG


Tiny parts to work with! You need to laminate the 2 corner pieces and fold the sides over.

037.JPG


Then glue them in place, 2 per deck support.

038.JPG


2 of the deck supports in place. The colors give a nice "deep-sea" feel to it all ;)

039.JPG
 

Attachments

  • 029.JPG
    029.JPG
    629 KB · Views: 12
Last edited:
I got all four of the deck supports in place. The deck is looking pretty good in this picture I think.

040.JPG


Time to cut and glue in place the frames for the "cannon ports". Each of the frame parts are different and are handed left and right. I found it easier to use a cotton swab moistened with water to roll the upper area of the frame. This is a tricky bit! Take your time, and enjoy the experience! ;)

041.JPG


I have the frames all in place. 19.2P thru 19.8P. 19.9P is ready to be glued in place. Everything is minus tabs by the way.

043.JPG


19.9P is attached successfully.

044.JPG


Now to tackle the other side of the ship for the frames. 19.2L thru 19.9L.

045.JPG


A bit blurry, but you get the idea. Lowering in a frame for attachment. I painted a tiny bead of glue along the bottom edge of the frame first. Then wait for that to dry. Then tack the upper edges accurately in place. Followed by a bead of glue around the whole frame to provide a little strength.

046.JPG


Here is the door decoration parts 18.2 & 18.3. Each of these has a skin part that must be cut and glued on.

047.JPG
048.JPG


These look pretty nice! The instructions leave out some of these details.

049.JPG


050.JPG


I have to get some kind of stand to support the model while building it. Its just too easy to damage the small parts.

051.JPG
 
Face it, you couldn't make a crappy model if you tried. Even your threads and technique demonstrations are top notch!! :)
 
  • Like
Reactions: mtrappett
Nah, just call it as I see it. When I think about everything you have posted, well, i's just awesome. Your build threads are detailed enough to help people out now and in the future. You would be surprised by the unique amount of visitors that pass thru this forum everyday researching all kinds of things. They don't join, but they glean the information. Seeing someone skin a hull, and seeing it done well is something that once seen can be understood and reproduced and help the seeker improve upon.

I made a "J" class sailing racing boat out of paper, then used Bondo to smooth it out. It became the plug for a fiberglass model that when finished was around 3' long. Full R/C control with the ability the haul in the boom, it had a self tending jib, folding prop when the wind wasn't cooperating.. The person I made it for put it on their fireplace. It never saw the water. I made it for her because she used to let me take out her 10m meter Pearson sail boat. 12' 6" bean, 6 ' foot fin keel, by myself, anytime I wanted. The boat sported a 50' foot mast and a 150 Genoa with a fully battened main sail with roller furling on both sails. That is something that does not happen often. It was before the internet was as prevalent, and it was "Wooden Boat' magazine, which I had a subscription to where I learned how to loft hulls. Things are much easier now. I had no idea that paper models even existed like they do. Columbus syndrome, a painful way to learn things when it's all you have. I know good work when I see it, and masterful work when I see it. :)
 
Nah, just call it as I see it. When I think about everything you have posted, well, i's just awesome. Your build threads are detailed enough to help people out now and in the future. You would be surprised by the unique amount of visitors that pass thru this forum everyday researching all kinds of things. They don't join, but they glean the information. Seeing someone skin a hull, and seeing it done well is something that once seen can be understood and reproduced and help the seeker improve upon.

I made a "J" class sailing racing boat out of paper, then used Bondo to smooth it out. It became the plug for a fiberglass model that when finished was around 3' long. Full R/C control with the ability the haul in the boom, it had a self tending jib, folding prop when the wind wasn't cooperating.. The person I made it for put it on their fireplace. It never saw the water. I made it for her because she used to let me take out her 10m meter Pearson sail boat. 12' 6" bean, 6 ' foot fin keel, by myself, anytime I wanted. The boat sported a 50' foot mast and a 150 Genoa with a fully battened main sail with roller furling on both sails. That is something that does not happen often. It was before the internet was as prevalent, and it was "Wooden Boat' magazine, which I had a subscription to where I learned how to loft hulls. Things are much easier now. I had no idea that paper models even existed like they do. Columbus syndrome, a painful way to learn things when it's all you have. I know good work when I see it, and masterful work when I see it. :)
Thank you Zathros :)

I really enjoyed reading about your sailing boat project. Things seem so diluted these days with everything being ready built, ready to run, and all that. There doesn't seem so much sense of achievement building something from scratch. It sounds like you have a lot of different skills, and that was a huge accomplishment building that model. It was all new then too before the Internet , it seemed more like a process of designing and creating something that nobody else had done before. Those were the good-old-days! My older brother in England enjoys building model steam engines these days. He always said that he should have been born back in the 1940s - 1950s. He loves building models from scratch too. Its more of a pioneering thing isn't it? Exploring the ideas inside your own mind that you want to build.
 
  • Like
Reactions: zathros and mijob
Off we go again! :)

The edges of the doorways are layered by several parts so be careful to check all of the sheets to make sure you have them all accounted for.

001.JPG


Parts for groups of assemblies can be scattered across all of the sheets of the model.

002.JPG


Unfortunately, the instructions for the model doesn't mention about the following side pieces (19) and the frames construction? That means parts 19P, 19.1P thru 19.9P and 19L, 19.1L thru 19.9L. That's a lot of parts not explained in the text.

003.JPG
004.JPG
005.JPG


V1 is comprised of 2 sides. This is not mentioned in the built text but I decided to install it now before it would be too late after the panels will be fitted shortly.

006.JPG
007.JPG
008.JPG


I bought a clamp to hold the ship while working on it. The clamp works really good. It allows repositioning of the model very easily by slackening off the large collar on the base, moving the model to the desired position, then tightening the collar again. I REALLY recommend it for this project!

009.JPG
010.JPG
011.JPG
012.JPG


I carefully scribed the planks to give a more 3D effect. Thanks Rhaven for mentioning about the technique. It seems to really work well!

013.JPG
014.JPG


Upper Deck Cannon Carriage Construction Details:

Tips:

Assembly should follow parts number schedule. Elmer's glue used for all non-flexible joints - sides to front, axles to body, wheels to body. All other pasted joints used Aleen's Turbo Tacky Glue thinned about 50% with water. Use brand new blade for cutting all of carriage parts. 2 pairs of tweezers recommended for some pieces. Tackle one carriage at a time to prevent loss of parts and loss of mind. Only cut these parts when needed. Separate the "zones" of parts and put them in a small container with a lid. Allow parts to dry such as sides (20+20.1) to front (20.2+20.3) before moving on to glue axels.

Paint the edges of the piece with watercolor paints with a very fine tip brush. Fiber-pens tend to "bleed" into the main area of the paper.

There are only half of the parts 20.1 provided (14). I scanned and printed an additional quantity to complete all of the carriages. Let me know if you need a PDF copy for your own use.

Attempt no more than 2 assemblies a day to avoid burn-out.

20 - Sides (card) x 2
20.1 - Sides (color) x 2 [only 14 of 28 provided]
20.2 - Front (card) x 1
20.3 - Front (color) x 1
20.4 - Axel, Rear (card) x 2
20.5 - Axel, Rear (color) x 2
20.6 - Axel, Front (card) x 2
20.7 - Axel, Front (color) x 2
20.8 - Wheel, Large, Front (card) x 2
20.9 - Wheel, Large, Front (color) x 2
20.10 - Wheel, Small, Rear (card) x 2
20.11 - Wheel, Small, Rear (color) x 2
20.12 - Floor (card) x 1
20.13 - Floor (color) x 1
20.14 - Hub (card) x 4
20.14 - Hub (color) x 4 - [same part # shown on diagram]

Sub Total - 32 parts per cannon carriage
Total Parts 14 x 32 = 448 parts total for all upper deck cannon carriages


015.JPG


Half of the colored paper skins 20.1 were omitted from the sheets of parts. I scanned and printed more. There is a very minor color difference but nothing that is of concern as these are buried away pretty much anyway.

016.JPG
017.JPG


These are pretty intricate I guess. Nearly 500 parts for all these cannon carriages. Many days work to build them all. The build text for these is written as, "On the pic. 7 there is a scheme of gluing of the details of the gun-carriages 20-20.14." That's the only mention of them I can see anywhere? It doesn't mention when and how they should be fitted to the ship either? :(

018.JPG
019.JPG


The colored paper wraps around the card sides. Its best to thin the white glue about 50% to allow a smooth finish. Also, be sparing with the glue.

020.JPG
 
Last edited: