
That is very clean and precise build. Your attention to detail is outstanding and I love the added bits. Congrats on a great model and looking forward to your next project!
mijob's TIE Phantom
- Thread starter thegreek270
- Start date
You are using an out of date browser. It may not display this or other websites correctly.
You should upgrade or use an alternative browser.
You should upgrade or use an alternative browser.

- Apr 5, 2013
- 14,406
- 11,040
That model is studio quality miniaturization. It's a pleasure to look at. ")
Hello again,
thank you very much for your kind comments.
This model was made a MODEL OF MERIT recently and I'm very happy that you all liked it that much.
I was hoping to finish the base so i can present it in a more suitable way ... but...
Life had other plans

(A little burst in the main water supply of my apartment, flooded kitchen and living room, opening the wall to find the damage, fix it, clean up and so on and so on...., nothing serious ...)
...)
In Greece we have a saying, it translates somehow like this.
"While you are making plans for yourself and others, the big guy upstairs is laughing at you"
I'm sure there are similar meanings in other cultures and languages.
Anyway, here is what i had done so far.
The "Evolution" of the holder with it's changes. (Still WiP)

and some tests for the base (als0 still WiP)

These are just tests, The right base should give you a little idea how it could look when finished, imagine it with black paper and a white Text on the side.
I will be back soon.
Thank you all
thank you very much for your kind comments.
This model was made a MODEL OF MERIT recently and I'm very happy that you all liked it that much.
I was hoping to finish the base so i can present it in a more suitable way ... but...
Life had other plans
(A little burst in the main water supply of my apartment, flooded kitchen and living room, opening the wall to find the damage, fix it, clean up and so on and so on...., nothing serious
...)In Greece we have a saying, it translates somehow like this.
"While you are making plans for yourself and others, the big guy upstairs is laughing at you"
I'm sure there are similar meanings in other cultures and languages.
Anyway, here is what i had done so far.
The "Evolution" of the holder with it's changes. (Still WiP)
and some tests for the base (als0 still WiP)
These are just tests, The right base should give you a little idea how it could look when finished, imagine it with black paper and a white Text on the side.
I will be back soon.
Thank you all

I think that that will bmake for a very interesting base.
WIth that being said, once you have finished the base (and have the model displayed on it,) I can easily change out the photo with an updated photo, with no problems or issues.
WIth that being said, once you have finished the base (and have the model displayed on it,) I can easily change out the photo with an updated photo, with no problems or issues.
Hello all,
it's been a while but I'm still on it.
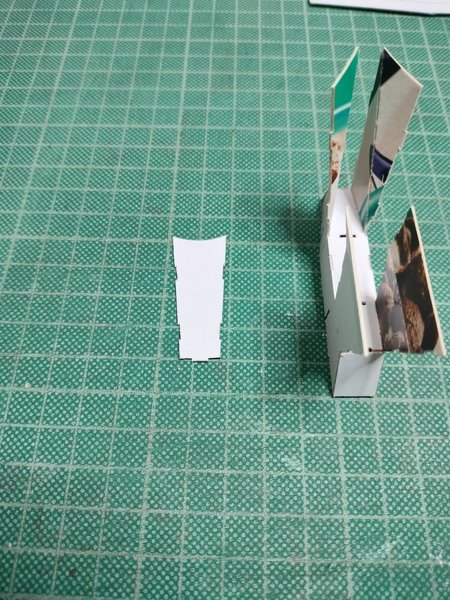
I managed to combine this (the one on the right is the final version)

with the base

resulting in this


This is the final base core. Now I'm working on the "Skin"
WiP

Don't bother about the brown color, it is just for testing and i had a lot of it laying around. The final will be black.
A little teaser how it will look

Will be soon with you again with updates.
Thank you
it's been a while but I'm still on it.
I managed to combine this (the one on the right is the final version)
with the base
resulting in this
This is the final base core. Now I'm working on the "Skin"
WiP
Don't bother about the brown color, it is just for testing and i had a lot of it laying around. The final will be black.
A little teaser
how it will lookWill be soon with you again with updates.
Thank you

Hello,
Thank you Rhaven Blaack.
Hello mijob, yes of course i will")
I just have to find a way to make them build-able for everyone.
As you can see from the pictures these are laser cut (saves me a lot of time with all the tests, the laser is much faster then my hand with the scissors )
Not everyone has one or access to one so i have to adapt everything to do it the usual way, but I'm on it, just need some time.
Thank you
Thank you Rhaven Blaack.
Thats is looking great are you going to make a template for it?
Hello mijob, yes of course i will
I just have to find a way to make them build-able for everyone.
As you can see from the pictures these are laser cut (saves me a lot of time with all the tests, the laser is much faster then my hand with the scissors
)Not everyone has one or access to one so i have to adapt everything to do it the usual way, but I'm on it, just need some time.
Thank you
Hello,
slowly I'm getting there.
I managed to finish the templates. Here they are.

i glued it to cereal card and started some cuts

Here is the other one

Same game here, glued it to cereal card and started cutting


i took my time with these slits. They have to be as precise as possible to ensure a good fit and alignment later.

One part done, a view more to go.

The third template will be the "Skin"
I made two versions with a bit modified Font.
This one ?

or this one ?

but there is still time to decide that. First i have to build the core.
hope to be back soon.
Thank you
slowly I'm getting there.
I managed to finish the templates. Here they are.
i glued it to cereal card and started some cuts
Here is the other one
Same game here, glued it to cereal card and started cutting
i took my time with these slits. They have to be as precise as possible to ensure a good fit and alignment later.
One part done, a view more to go.
The third template will be the "Skin"
I made two versions with a bit modified Font.
This one ?
or this one ?
but there is still time to decide that. First i have to build the core.
hope to be back soon.
Thank you
- Apr 5, 2013
- 14,406
- 11,040
I think late at night, when no one is around, your eyes get really big and you say "MY PRECIOUS!!"


- Apr 5, 2013
- 14,406
- 11,040
Such a well built model. The only one that matches it is the author's original. It's amazing that you two have graced this forum with such beautiful builds.
Hello All,
i finally found some time to continue with this project.
The parts are not complicated, just a lot of small corners and slits to cut.
Some attention is needed for the valley Folds.
For these i borrowed a technique which i saw at some models from the German Schreiber-Verlag.
They use a point or cross which has to be pinched through with a needle or something else pointy.


Then you can turn around the sheet and score the connection between the two holes the needle did.

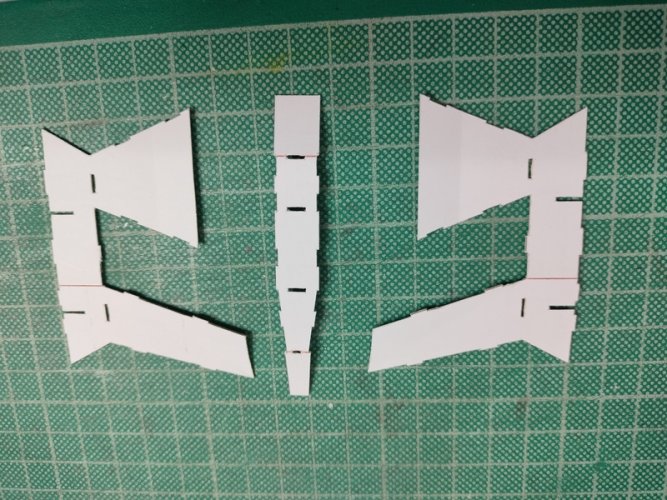
Here are all the parts for the core scored and cut out , ready for assembly.

I measured a thickness of 0,75 mm. That is actually too thick. It causes some fitting problems with the skin but i will address this later.
I recommend a thickness of 0,6 mm for the core parts. Otherwise you can compensate by cutting all the slits a little bigger than marked.
You should test fit all parts anyway to prevent bad surprises
The alignment of the bottom and top plates can be easily checked by positioning them on top of each other and checking the holes
If these match you should not have any problems.

Let's glue something.
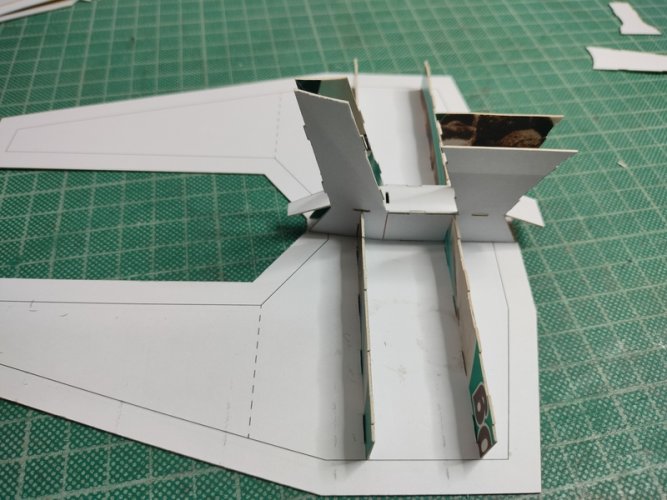
We start with the Base.

In order to keep these straight i just used these parts temporarily. These are not to be glued yet !

After the two strips where completely dry i took the parts out and started their assembly.

First side.

after gluing the second side i positioned that assembly in the base again to keep it straight.

After it is done i take it out and continue with the assembly.


Next part.


and the next one


i finally found some time to continue with this project.
The parts are not complicated, just a lot of small corners and slits to cut.
Some attention is needed for the valley Folds.
For these i borrowed a technique which i saw at some models from the German Schreiber-Verlag.
They use a point or cross which has to be pinched through with a needle or something else pointy.
Then you can turn around the sheet and score the connection between the two holes the needle did.
Here are all the parts for the core scored and cut out , ready for assembly.
I measured a thickness of 0,75 mm. That is actually too thick. It causes some fitting problems with the skin but i will address this later.
I recommend a thickness of 0,6 mm for the core parts. Otherwise you can compensate by cutting all the slits a little bigger than marked.
You should test fit all parts anyway to prevent bad surprises
The alignment of the bottom and top plates can be easily checked by positioning them on top of each other and checking the holes
If these match you should not have any problems.
Let's glue something.
We start with the Base.
In order to keep these straight i just used these parts temporarily. These are not to be glued yet !
After the two strips where completely dry i took the parts out and started their assembly.
First side.
after gluing the second side i positioned that assembly in the base again to keep it straight.
After it is done i take it out and continue with the assembly.
Next part.
and the next one
Attachments
Last edited:
Hello again,
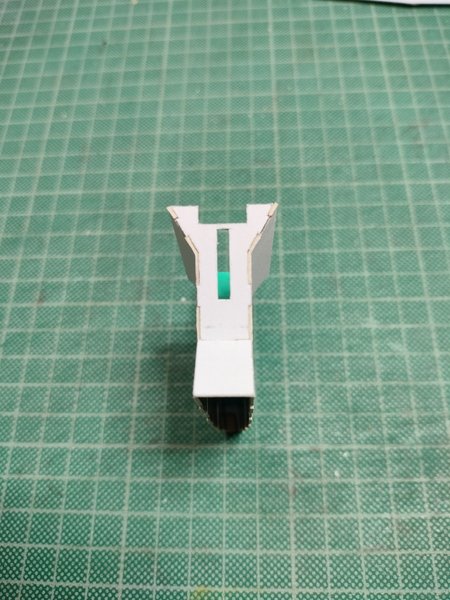
That is what we have so far.

Last part for this unit.

This part is ready

Let's glue it to the base.


That's it for now.
Will be very soon with you again.
thank you
That is what we have so far.
Last part for this unit.
This part is ready
Let's glue it to the base.
That's it for now.
Will be very soon with you again.
thank you
- Apr 5, 2013
- 14,406
- 11,040
O.K., your master crafting has long been established, but kudos to you for your recycling paper products. I get a great feeling seeing the printed side on the inside of your models. That makes a bold statement about this craft we enjoy, and the recycling nature that comes with it.
Superbe réalisation, c'est de l'artisanat sur mesure.
oups!!
Superb achievement, it is custom craftsmanship.
oups!!
Superb achievement, it is custom craftsmanship.
Last edited: