Lancia Stratos

Chuffy70

Well-Known Member
Jun 5, 2022
1,165
2,454
95
Norwich UK
In this thread I will attempt to build one of motor sports arguably most striking cars.

Hopefully it will be a gift to one of my local model groups members, as this ranks highly as one of his favourite cars.


Pictured here the finished model by some else (mine 'might look like this' :OOPS:)
Stratos finished model.jpg
Sometime ago @zathros put this into the resource section, along with the interior, so this build will feature that.

A bit out of my comfort zone as to knowledge of this subject, but we will give it a go...

Parts selected for the interior.

Lancia stratos (14).jpg

Some selected bits to start with.
Lancia stratos (12).jpg


Cut and folded.
Lancia stratos (13).jpg

Steering wheel and boss - cotton bud shaft for possible replacement of paper one

Lancia stratos (11).jpg

The rolled boss was a bit crude, so a replacement will be cut from the bud shaft.

Lancia stratos (10).jpg

Shaft replacement cut and steering wheel folded to what looks correct. Handbrake was a bit thin, so extra layers were added to bulk the part out.
Not even sure you'll see the pedals, but I have cut these out to add anyway - you & I will know they are there ;)

Lancia stratos (9).jpg

Front of steering wheel.

Lancia stratos (8).jpg

Floor and sides of the tub were also bulked up with extra layers.

Lancia stratos (7).jpg

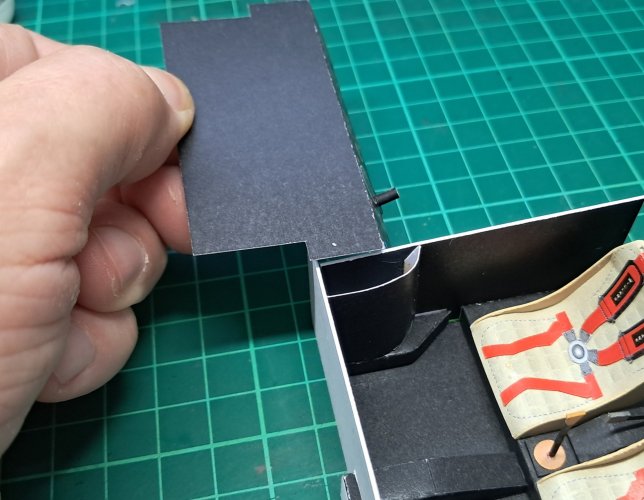
Most of the interior is now prepped for construction.
Lancia stratos (5).jpg

Seat platform and seat locaters added. Also side parts.
Lancia stratos (6).jpg

Here we have a first fault, the tunnel which the gear selector runs though is too long...

Lancia stratos (4).jpg

Instead of cutting off the end, I opened up the square on the bulkhead and passed it through.
If it gets in the way of anything later, then some judicial extraction will be needed.

Lancia stratos (2).jpg

Curved panel, presumably the wheel arch ingress were added along with the handbrake box.

Lancia stratos (3).jpg

Reverse of previous.

Lancia stratos (1).jpg

So far this has come together without much of a problem, albeit the instructions, or lack of, just a call out sheet of parts are very basic and part numbers duplicated in a very frustrating way.
THANKS FOR WATCHING... more coming soon
 
This looks like a very interesting project. You are off to a great start. I am glad to see that you have the interior for it.
I am looking forward to seeing how this turns out.
 
  • Like
Reactions: Chuffy70
OHH SO lovely. I saw one once in San Antonio Tx, it was brought back from Italy by an Airman....
 
  • Like
Reactions: Chuffy70
This looks like a very interesting project. You are off to a great start. I am glad to see that you have the interior for it.
I am looking forward to seeing how this turns out.
You and me both ;)
OHH SO lovely. I saw one once in San Antonio Tx, it was brought back from Italy by an Airman....
I can imagine it being quite eye catching
Thats a great start I gone keep an eye on this thread.
Left or right eye? :)
Absolutely! :)
Indeed...
 
Continuing on with the Lancia's interior...

A nice easy start - adding the gear stick

20250710_165425.jpg

The circle, square base and the stick itself were layed up to add some thickness to the parts.
Handbrake also added into position.

20250712_125812.jpg

Left & right side panels added - Gearstick looks a bit wonky, will sort that later

20250712_142431.jpg

Alternate view

20250712_142516.jpg

Seat time - Parts picked out.

20250708_232541.jpg

After a first glance I was almost thinking to cut around the dotted line, but that was not how the meagre instructions show them, so I proceeded as-is.
Part X-24 is supposed to be the posts which attach the headrests to the chairs... After laughing, pointing and generally saying "you must be joking!" I found an old pin, which I cut into four pieces, cutout the red holes and inserted into the headrest.

20250709_181313.jpg

The print on the seats was very weak, despite being professionally printed, thus I added some creases into the checkers just to add a very little something.

20250709_183018.jpg

The inner part of the seat assembles with a small lip to allow the main part to follow the contours. Unfortunately I didn't laminate these inner parts, which meant my lip was not very wide.
However, just doing a little bit at a time the seat conformed to the path given.

20250710_165122.jpg

Between the shape of the main seating area and the seat-sides, the top part of does not match up. Taking some flat-nosed tweezers I bent the top of the side panels inwards and added a cut down shaft from a cotton bud, some judicial use of superglue held all this together.

20250712_142755.jpg

Seatbelts were fed through the slots and then the headrest shafts were pushed through pre-drilled holes in the cotton bud shaft.
Nothing is glued here, as I'm unsure of how much headroom there will be, so for now they are 'working headrests'

20250712_142907.jpg

Dry-fitting the seats.

20250712_143010.jpg

Now another problem has shown its face. the dashboard does not fit where it should do...

20250712_143159 (1).jpg

Taking a look at the instruction call out the dashboard should be smaller in width and cover parts for the inner wheel arches.

20250718_175501.jpg

As you can see, the supplied part is nothing like it what-so-ever!

20250712_143212.jpg

So, for now I will leave it off until the main body is constructed and see what needs to be hacked about.
I may cut off all the details, replace the dashboard to the correct width, re-apply the details, and then just cover over the wheel arch tops.
The steering wheel will be added later, as I'm sure I can position the wheels turned in/out, thus the wheel will be needed to be in the correct position.
Rear wall left off too, just in case of fitment issues and incapsulating the window film.

20250712_143325.jpg

THANKS FOR WATCHING... MORE TO COME
 

Attachments

  • 20250712_143159.jpg
    20250712_143159.jpg
    377.7 KB · Views: 0
Everytime I see others building with small and dark colored parts I understand, why I could effort my cheap laser printer:bulgeeye:
Because it is cheap. Because print is coming of so easily during folding.
I see the builds of you guys and the parts are looking so nice with nearly undamaged print. I envy:eek:

Looks really nice so far @Chuffy70 !
This is a lesson that I found out the hard way as well. Inkjet printers are well worth the investment (on so many different levels). Even if you can find a good refurbished inkjet printer, you would be far better off with it then that of a laser jet printer.
 
Wow this is looking great and your comment is very helpfull for other builders
Cheers, I can be a bit too critical of other peoples work sometimes, but if its not said or pointed out then others will run into the same problem.
Just a tad frustrating when a part so simple is not corrected

You are doing a great job on this project.
Appreciated...as always
Everytime I see others building with small and dark colored parts I understand, why I could effort my cheap laser printer:bulgeeye:
Because it is cheap. Because print is coming of so easily during folding.
I see the builds of you guys and the parts are looking so nice with nearly undamaged print. I envy:eek:

Looks really nice so far @Chuffy70 !
Thank you for your interesting and nice comment.
You say undamaged, but even though these are professionally printed at my local copy shop, the colour along all my creases still crazes and requires touching up with paint in my case.
Valley or mountain folds with a blunt knife can sometimes eliminate this problem. My paper is generally thicker at 180gsm because I work on larger prints of A3 and only tend to use a darning needle to introduce my creases. The stock and methods of paper modelling vary muchly on stock used and techniques, also the printers used as @Rhaven Blaack has eluded to.
Stick with it, good results are normally just a simple solution away
 
I've had no Internet for 3 days.

This is an excellent model. If you build the model, ever again, there is some greeblin (like the stick shifter) that will really make this model pop. It's one of my favorites. Another one in this series is the McLaren "M8", which has the body lift off to reveal a completely detailed chassis. Great to see you building this, one of my favorites. The FIAT 125P is one of the most detailed car models I've ever seen. :)

Link = https://www.zealotmodels.com/resources/mclaren-m8.2518/

1752935410823.jpeg


1752935575021.jpeg
 
Last edited:
I've had no Internet for 3 days.

This is an excellent model. If you build the model, ever again, there is some greeblin (like the stick shifter) that will really make this model pop. It's one of my favorites. Another one in this series is the McLaren "M8", which has the body lift off to reveal a completely detailed chassis. Great to see you building this, one of my favorites. The FIAT 125P is one of the most detailed car models I've ever seen. :)

Link = https://www.zealotmodels.com/resources/mclaren-m8.2518/

View attachment 226593


View attachment 226594
I've downloaded them and will give them a go one day...
 
Interior waiting in the wings, its time to tackle something else on the Stratos.

Wheels can make or break a paper car model in my opinion, and on this model they a multi-part assembly.
Normally I would have a dry run with a spare, but luck is not on my side with this one, so if I make a mistake, its game over!
Some random tyre, wheel parts and axle/suspension parts.

stratos paper wheels (11).jpg

Outer tyre and side walls.
stratos paper wheels (12).jpg

Inner rim parts were a little tricky to cut from the pattern sheet, I'm all for saving paper, but these were jammed in!
stratos paper wheels (8).jpg

The woeful technical drawing on the so-called instruction sheet was slightly overly complex to decipher just what part went where!
As to how said part folds and fit was also a random fart in the wind!
Multiple part numbers for 'the same part' also added to the confusion - a colour call out of the individual part would have helped.

Screenshot_21-7-2025_225943_.jpg
Whilst scratching my head to what parts for the wheels went where, I decided for some easy folding with the front axle assembly.
The round circles numbered 104 don't even appear on the parts call out...more on that later methinks.

stratos paper wheels (9).jpg

I think it took about an hour to come up with this arrangement, back and fourth, more back and fourth from the crap illustration, dry fitting, re-bending parts until there looked something vaguely like a front axle suspension doo-dad!
stratos paper wheels (7).jpg

That unit above needed something to fit into, so I hunted down the front and back chassis boxes.
Part 85 is the steering linkage.

stratos paper wheels (6).jpg

More chassis part, this time the side walls to hold the boxes together.
stratos paper wheels (5).jpg

Front chassis box.
stratos paper wheels (4).jpg

If you want steerable wheels, the rectangular cutout is required.
stratos paper wheels (2).jpg

Inner wishbones if I'm correct with some wooden dowl cut to size. The instructions are once again very vague here, So I just went with my own plan, the wood fitted, thus it will do for me.
DO NOT glue the inner wish bone parts to the axle assembly beforehand, as you'll never get it through the hole in the chassis.
Dry fit everything on this particular model.

stratos paper wheels (1).jpg

That's all for today...

THANKS FOR WATCHING...
 
Last edited:
If you paint the "tire" part of the wheels with "Liquid Electrical Tape", they will look like rubber. You can add treads using string and thins strips of thin paper, you can practice on flat sheets of paper till you get the treads you are happy with .

Did you know only 492 of these cars were manufactured. They are worth a fortune. .
:)
 
  • Love
Reactions: micahrogers
So you are lost with this instruction I hope you will add a sat nav in your model to get back on track.

Anyway what you are doing is looking great!
 
  • Love
Reactions: micahrogers