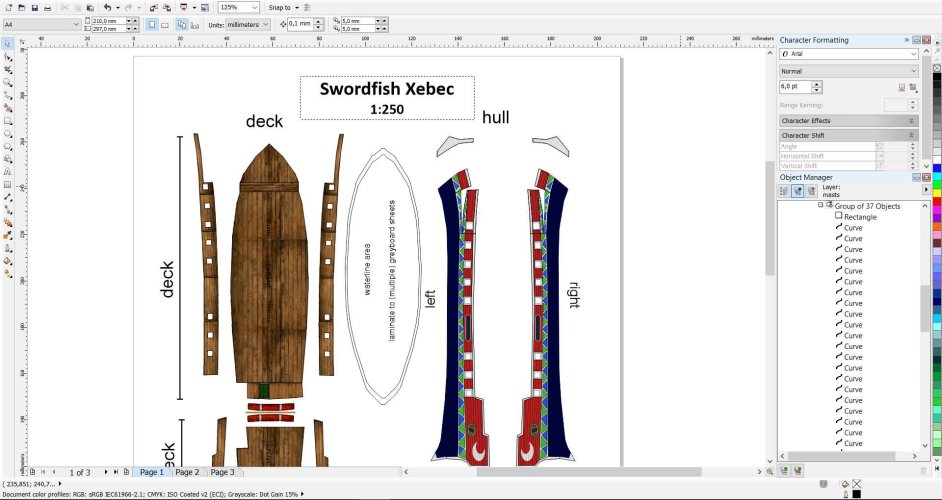
20 gun pirate xebec - 1:250 scale

ElMäx

Senior Member
Nov 10, 2024
240
589
I wanna design a sailing ship template by myself. Twenty years ago there was this pirate sailing game, named after a big Disney franchise. In fact it was the second sailing and pirate game of a developer and Disney jumped in, bought the unfinished game, named it after their new pirate franchise because they needed a pc game to back up their new movie and make more money ...

... or so the legend tells.

It was a great game. Turns out it still exists, playable on modern operation systems with modified game engines.
1000018790.jpg


I managed to extract ship models with the help of old modding tools. UV maps intact I could load them up in blender. Divided the big parts in smaller sections and successfully exported them via paper model plugin.
1000018792.jpg


Imported the svg into my old trusty vector graphics software, reworked the exported parts, redraw the original textures as vector graphics.
1000018791.jpg


All this I did somewhen in the last few months in small sessions from time to time.

A few weeks ago I finally tried to actually build the hull of the ship, to see if my drawings actually make any sense.
1000018888.jpg

1000018786.jpg

1000018787.jpg

1000018789.jpg


I am pleased with this first trial. There are some minor things to straighten out and adjust in the template.
The cannons I borrowed from the Enterprise I free sample model at the war artisan page. Put thwm on just to hve some cannons.
A few days ago I designed my own cannons:
1000018887.jpg

1000018901.jpg
 

Attachments

  • 1000018791.jpg
    1000018791.jpg
    138.1 KB · Views: 30
That is a very good looking first attempt my friend. I'm looking forward to see your next update.
 
  • Like
Reactions: ElMäx
thanks. I still have to work out the stairs to the quarterdeck and the launch/small boat. the stairs have to be a ramp with stair textures on this small scale I guess. And my first try on the launch did not work out. It is really small. I think I will make the launch bigger than the model from the in-game ship.
With stairs and launch I will have most essentials of the deck finished and I can take the next step - the rigging. As it is a xebec I will go full lateen sail. And that is an obscure topic for me.

Anyone here knowing something about rigging? Especially lateen. @zathros I got the impression you know stuff about sailing, am I right?

EDIT: also need to add the golden decoration on the bow sprit. And two things not in the game model: 1) swivel guns, perhabs on the quarter deck and 2) oars! I read that xebecs, with a deck sitting so low above the waterline could be propelled by oars, too. The oars must have gone through the side of the hull but how many and the rowers must be seated. Than again benches would obstruct the deck because there are also the cannons ... I don't know
 
Last edited:
  • Like
Reactions: zathros and mijob
There was a member who has made a ship model with sails and rigging. I will search for the thread.

Found it.

 
There was a member who has made a ship model with sails and rigging. I will search for the thread.

Found it.

Yes, you are right. I also read through that thread last year. Impressive build.
 
I am quite puzzled at the moment. I just now realize that the xebec model in the game does not show any steering device for the rudder. no wheel, no lever.

photo_2_2025-12-29_23-27-08.jpg

photo_1_2025-12-29_23-27-08.jpg


As you can see the mizzen (aftmost mast) sits more or less on top off the rudder. not much space in between to fit a steering mechanism. Yes, it is just a pc game, a simplification and there are many things missing that are essential for a working sailing ship.

But I already invested so much time in processing that particular model that I do not want to switch to another ship model from the game (I wanna do more ships from the game in the future but first this one). Besides that it is also my favorite ship while playing the game, attacking colonial trade ships, seizing their goods, freeing the slaves, doing pirate things ...

I found many ship plans for xebecs on the website from my last post. I will try to relocate the mizzen slightly, to add a lever for the rudder.

In the ship plans there is also a plan for a xebec with an off-center mizzen. it goes right next to the rudder lever. Surprises me. I just have "wikipedia knowlegde" about sailing. It kinda looks strange with an off-center mizzen but it may be genuine. Anyone here know something about that?


EDIT:
here some screen shots from the plan with the off-center mizzen:

mizzenoffcenter.png


mizzenoffcenter2.png


I also read that the mizzen is mainly for holding course. Perhabs that's why it can be little bit off-centered? What does that mean regarding wind flow and how the force of the wind is applied to the vessel?
 
Last edited:
Teladi Kea done. Back to Earth!
I tweaked the deck a little bit and reworked other parts. Now you can actually see how I build the ship.

The hull sides and the deck sides. I cut out the gun ports.
1000021201.jpg


The deck sides consist of two parts each side. Need to be glued to the inside of the hull sides.
1000021202.jpg


I made a template for the ship area at waterline. It is used to prepare 4mm grey board. I used 4 boards for this.
Glueing a board to a board sheet, then drawing the shape around it and cutting along the line. Repeated this to get 4 boards. Doing it this way the boards get gradual broader but in steps. When the glue dried out I sanded the steps away to create a smooth inclined edge for the curved ship hull right above the waterline.
I hope you can comprehend and I expressed this clearly
1000021203.jpg


I cut out the deck and recessed the door, then folded the deck.
1000021205.jpg


Glued 1mm grey board to the underside of the deck and also to the forecastle. I need stability there for the mast later on.
1000021207.jpg


Carefully glued the sides to the deck.
1000021208.jpg


Then I applied glue to the "waterline boards" and slipped them into the inside of the hull.
1000021210.jpg


Turning the hull around and putting it to a flat hard surface I can glue the sides at the rear of the waterline to the board and during that also correct the position of that board inside the hull.
1000021211.jpg


Glued the stern to the hull. That is a bit finicky and I have to optimize that part.
1000021212.jpg


Cut out the quarterdeck and reinforced it with 0,5mm board.
1000021214.jpg


Glued it to the hull by aligning the aftmost edges and then working to the front end of the quarterdeck.
1000021215.jpg


Glued on the visible part of the rudder above the waterline.
1000021226.jpg


Assembled the bowsprit and thinned out a toothpick that will be glued inside of the bowsprit.
1000021217.jpg


Letting a bit of the pick still stick out, I put it on the bow of the hull. Placed with normal glue and after aligning applied some super glue to reinforce the connection.
1000021219.jpg


Cut out and assembled the quarterdeck railing and glued it to the foremost part of the quarterdeck. almost to the edge.
1000021220.jpg

1000021221.jpg
 
Up until now I still did not design a stair. So I drew and cut a ramp and walls to cover up the corresponding hole. I used the deck part of an old obsolete print for this.
1000021222.jpg

1000021223.jpg


But I thought I can do better and I made small steps. just 4x2mm pieces with a 90° fold along the long axis and glued to the ramp. Looks good I think.
1000021224.jpg

1000021225.jpg


I have to add the stair parts to the template.
 
Wow, Awesome work it looks very straight and solid. The stairs with the steps make a big difference. Keep it coming...
 
  • Like
Reactions: ElMäx
To keep the "gunnels" straight, use strips off wood on each side, the covered with another strip to for the top of the gunnels (railings) that run along he whole top edge of the ship. They can be stained even after you glue them on. Lofting hulls is one of my specialties, and I'm good oat it.

I helped make some tooling for the shipwrights on the whaler at the Mystic Seaport at New London, the "Charles W. Morgan:. They were building Clinker style rowboats for her. I told the guy he did not have the tool he was using prepared properly. He challenged me to go over the barrier, where visitors were not allowed.

I modified his block, and when he hammered in the Copper nail, it instantly curled back into the wood, and he was able to do this in 1/10th the time he had been doing it. He asked me if I was a "shipwright", I told him no, I designed tooling. He had me inspect his tools, which I dare not touch, they were over 100 years old. My girlfriend and her mother were looking for me for an hour, and when they found me there, they asked "How the h*ll did you end up back there. I told them I was helping the Master shipwright. They were no longer upset. True story.
 
Excellent workmanship and design!! :)
 
  • Like
Reactions: ElMäx
Thanks! Yes, the hint to use strips of wood for the gunnels sounds good. I am just wondering where I can get those strips:) ....
 
I had this uncertainty regarding the mizzen and the rudder.
But I found this ship plan of an algerian xebec from 1830. And it looks like the mizzen, being a quite small mast, does not go through the whole height of the ship, but is attached to the beam on which the rudder is mounted and the steering lever is attached underneath the base of the mizzen. That way there is no problem of the mizzen being located that near to the rudder.
Take a look:
116783GM01PL0033.png


Let's see what I can do regarding this. I already tweaked the deck layout to gain a little more space between mizzen and rudder but I have to try out and see what will work.
 
You can get Balsa strips from most hobby sores. They will have other types of wood you might want to consider. You could use Infrared light activated glue for an instant attachment to anchor the end, the use a gap type crazy glue to run a bead, using the light activated glue. The use of the 2 allows for a nice smooth sheer, the gap filling cray glue is much stronger, but takes long4er to dry. The light activated stuff is instant. The stuff below is instant. I don't like the dispenser though, I use a pin to seal it. Lately, I take off the package before I open it, and just take out the tube, then use a pin to open and seal it. The dispenser is overdone, the actual U.V. light I keep in a small plastic bag with the separated U.V. light , and keep both in a dark lightproof small cardboard box. and bonding agent are excellent.

I just fixed my clear plastic glasses,I forgot they where sitting on the top of the air cleaner of my Toyota Avalon (2014) and slamm4eed the hood on them. The frame brook on one side into two pieces. I fished the lens out of the engine well, brought it inside, and had it repaired in around 30 seconds with the U.V. Light Bonding Agent. I'm still wearing them and seem is only the crack, barely visible. I just had new lenses put in my eyes, so I'm going for new glasses this week. T.M.I., I just wanted to have an idea of how much stuff I've fixed with the U.V. stuff. Crazy Glue can get sloppy, and ruin a lens. Home Depot has this stuff. In the long run, Crazy glue is the best, use U.V. light to anchor the end of the rail, especially if you plan to cover it wood strips. I only do that with ships that have framing, and a double crisscross pattern, the outer layer staggering the ends to make it more realistic. Each end would end on a former, as it would in a real planked boat, clinker or, edge to edge (clinker uses brass or copper nails with an iron hand buck to bend the nail back into the plank as the nails comes through. I helped restore some clinker built rowboats at Mystic Seaport in Connecticut, and modified their tooling, as I am a toolmaker. :)

44.jpg


JBWeld UV GLUE.jpg
 
You can get Balsa strips from most hobby sores. They will have other types of wood you might want to consider. You could use Infrared light activated glue for an instant attachment to anchor the end, the use a gap type crazy glue to run a bead, using the light activated glue. The use of the 2 allows for a nice smooth sheer, the gap filling cray glue is much stronger, but takes long4er to dry. The light activated stuff is instant. The stuff below is instant. I don't like the dispenser though, I use a pin to seal it. Lately, I take off the package before I open it, and just take out the tube, then use a pin to open and seal it. The dispenser is overdone, the actual U.V. light I keep in a small plastic bag with the separated U.V. light , and keep both in a dark lightproof small cardboard box. and bonding agent are excellent.

I just fixed my clear plastic glasses,I forgot they where sitting on the top of the air cleaner of my Toyota Avalon (2014) and slamm4eed the hood on them. The frame brook on one side into two pieces. I fished the lens out of the engine well, brought it inside, and had it repaired in around 30 seconds with the U.V. Light Bonding Agent. I'm still wearing them and seem is only the crack, barely visible. I just had new lenses put in my eyes, so I'm going for new glasses this week. T.M.I., I just wanted to have an idea of how much stuff I've fixed with the U.V. stuff. Crazy Glue can get sloppy, and ruin a lens. Home Depot has this stuff. In the long run, Crazy glue is the best, use U.V. light to anchor the end of the rail, especially if you plan to cover it wood strips. I only do that with ships that have framing, and a double crisscross pattern, the outer layer staggering the ends to make it more realistic. Each end would end on a former, as it would in a real planked boat, clinker or, edge to edge (clinker uses brass or copper nails with an iron hand buck to bend the nail back into the plank as the nails comes through. I helped restore some clinker built rowboats at Mystic Seaport in Connecticut, and modified their tooling, as I am a toolmaker. :)

View attachment 234441

View attachment 234440
light activated glue. never heard of it. crazy stuff.

regarding the ship building: wood strips sound good for the gunwales. But for this model I try to keep it simple and will just use card board. toothpicks for the masts and bowsprit. Also because it is very small. 1:250 scale again. Thought about using strips to mimic the planks on the hull - like with panel greebling on the space ships - but those strips have to be really really thin. Better just use few strips to highlight some details.

I have some bigger template for sailing ships from other artist. There I could make the planking of the hull, but not on this small one here.
 
  • Like
Reactions: mijob and zathros