
I added some floor markings and caution flags to the resource section for the hangar bay. They are to be printed out on regular bond copy paper
The UHU02 Colonial Viper appreciation thread
- Thread starter Revell-Fan
- Start date
You are using an out of date browser. It may not display this or other websites correctly.
You should upgrade or use an alternative browser.
You should upgrade or use an alternative browser.

Thank you all for the likes and I see some have downloaded my assesories to the hangar. Enjoyand here are some more photos of the build and the Viper is back in a diorama set up. The bay gets some extra details and the work continues. I am in the process of making my own too cabinetsfor uploading. the tool tray station is done I just have to tweak it a bit more and i will post the photos as oon as I can. Here are some photos for your enjoyment. Enjoy and see you all next posting.
.jpg")


Attachments
I really like how your hangar diorama is turning out.
It's a treat!")
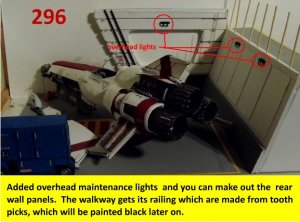
Thanks for the likes and for the comments. This diorama is almost coming to an end after a long enduring process from everyone involved. There are a few details but the viper is back in the front lead position and the diorama is looking real neat. The new mechanics tool chest will be uploaded soon for your enjoyment. The photos are almost self explanatory so I did not add any comments to the photos. The railings is made from a long wood dowel the thick size of a tooth pick, and later painted black. I was planning on making a few more figures to place on the walkway, looking down on the maintenance bay but I need to move on to other items in my build in-box. There is a pin up of Grace (Boomer) Parks on the desk and I was considering making a toaster on the desk as a pun for the Cylons. I may still do it. If you look closely, there are a few pre-flight inspection "remove before flight" tags on the viper. The tool chest, has open drawers as an option. While not in the episodes, I made a wall plaque of the PRIMUS coat of arms for the back of the bay. These photos are a bit busy and full of small details. Enjoy and see you all soon with the final product.
- Apr 5, 2013
- 14,415
- 11,044
Awesome. Really. I hope you have a secure spot because those little fingers rumbling around your home are going to find those models someday!!
Lee Stringer & Doug Drexler must see this!
I know who Drexler is, but I am not too sure about Stringer. Thank you for placing me in Drexler's category, He has done many fine modeling works in the Sci-Fi community.
Awesome. Really. I hope you have a secure spot because those little fingers rumbling around your home are going to find those models someday!!
Of all my grandkids, I have only one who likes to build things with his hands, and he is into HALO and Assassins Creed, but he does like my work.
FRACK-tastic!!!!!
Can't wait to see you tackle a Star Wars : New Hope rebel "attack" diorama!
Which attack portion of the movie, the hangar or the attack?
Thanks for looking in and I am pleased that you like my diorama.
You are really going to town on this one!
The details are OUT(FRAKKING)STANDING!!!
Thanks for looking in, sometimes I do get carried away with my tunnel vision and can't stop but the end is coming soon, and I need to finish a couple of threads and start something new.
I posted another resource into the downloads for your enjoyment, I will do the build sequence soon. All the photos have been done, I only have to edit them. Enjoy and see you all soon with more stuff to come this way.
Lee has done MANY of the CG effects on the New BSG and "translated" LOTS of TOS ships into CG versions, including the Rising Star. You have to see his flickr gallery. The pictures helped me a lot in making the modules for my TNS 1:32 hangar bay:
https://www.flickr.com/photos/lee_stringer/sets/72157623439022343/
(BTW, I still need some test builders for that!") )
)
He also worked on Firefly / Serenity.
Thank you so much for the fuel drums!!!
https://www.flickr.com/photos/lee_stringer/sets/72157623439022343/
(BTW, I still need some test builders for that!
)He also worked on Firefly / Serenity.
Thank you so much for the fuel drums!!!
Lee has done MANY of the CG effects on the New BSG and "translated" LOTS of TOS ships into CG versions, including the Rising Star. You have to see his flickr gallery. The pictures helped me a lot in making the modules for my TNS 1:32 hangar bay:
https://www.flickr.com/photos/lee_stringer/sets/72157623439022343/
(BTW, I still need some test builders for that!
He also worked on Firefly / Serenity.
Thank you so much for the fuel drums!!!
You and the community are welcome to the fuel drums. As for Lee, how can I be so obtuse and forgetful, I have many of his photos in my BSG reference archives, I just did not pay attention to the maker. Thanks for reminding me of that link. Thanks for the request, I still have a big workload to play with at the moment.
As mentioned earlier, here are the updates on building the fuel drums for the display. I tend to make my barrels differently from others, in that I do not use tabs but roll the cylinder to the size need and the thick edges of the walls will give an adhesion point for the top and bottom of the drums.


The end of the year is here and may all who look in, have a very happy and profitable new year. Just as the year ends, this model is finished. The only thing left, are the details to be edited. Here are the final updates on the fuel drums and the tool box will be next. The tool box templates will be uploaded soon to the resources.


Incredible. There's so many model kits in there!!
They were made especially for this build, but are free to the community to enjoy in making their maintenance bay. The items can also be used to enhance any mechanic shop diorama with the removal of the BSG logos or leave them on as added spice.
The fuel tanks look GREAT!!!
Thanks, I had problems with the dome and it should have been a bit lower or made it into a one piece instead of petals. I am glad that you have enjoyed it. Now here is the final item in the diorama, the mechanics tool chest which is now in the resources.
The chest can be done as a box, with the drawer panels laminated to the front or with open drawers. The smaller, the basic box will suffice, The larger the upscale,the more open drawers can be made. Enjoy and soon I will post the finished diorama and I will move on to other subjects.
I guess you have all been waiting for the final pics, well here there are, I wish that I had made a suitable helmet but I am still playing around with that and it is very hard to get the right curvatures out of card. The final photos of the tool chest is here and the extra details are in place. Next posting will be the last photos and off to another adventure. By the way, look closely at the details, there is a toaster around there somewhere.


And here are the last photos. Thanks to UHU02 for making it possible with his fantastic talent in the making of the viper templates. This has been a long road and I am glad that it is over. I enjoyed in making it a bit different and the upscaling helped tremendously. Thanks to all of you who have looked in on the thread and for all of your kind comments. Enjoy and I will see you soon with another project. So many models to do and so little time.


