Space Wulf Dreadnaught

silveroxide

Senior Member
Aug 22, 2007
2,014
504
Fayetteville NC
After a long sabbatical, I am back with another build thread. The comments are in the photos so enjoy the sequence trip. I did use a Games workshop model for reference and did make some adjustment to Eli's model. It is the approximate same size as the Games Workshop model, and it is sturdy enough to handle a table top game. The design is by Eli Patoroch and is over at amormans thread.
001.jpg


003.jpg


004.jpg


005.jpg


006.jpg


.

001.jpg


003.jpg


004.jpg


005.jpg


006.jpg


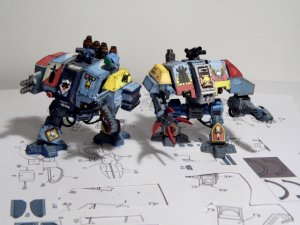
Here are a few shots of the finished model and a games workshop model which I used as reference
071.JPG


A010.jpg


A0014.jpg


A0014.jpg
 

Attachments

  • 071.JPG
    071.JPG
    174.6 KB · Views: 10
It is good to see you building again!
This is FANTASTIC! As always, you are doing a SPECTACULAR JOB!
My son is into WH40K. I may have to build one for him if he sees this. :cool:
 
The Master is back, and back to building. So nice to hear from you!! :)
 
  • Like
Reactions: Revell-Fan
More updates on the Dreadnaught. As you can see by now, my verdsion is slightly different from Eli's. He gave me a great base to start with. That hip joint is the weakest part of the dreadnaught, so to make it strong, I heavily laminated the joint and added drilled holes to insert rods/pins. The rods/pins will give the joint strength to handle the table top gaming.


028.jpg


029.jpg


030.jpg


031.jpg


032.jpg
 
Your Grandchildren must be dying to get their hands on these!! :)
 
Your Grandchildren must be dying to get their hands on these!! :)


Actually, my grand kids do not have that artistic urge like their grandpa. They are mostly in favor of anything that has to do with ball, baseball, football, basketball, soccer, etc etc.


And now to place the new updates on screen for your pleasure.

033.jpg


034.jpg


035.jpg


036.jpg


037.jpg


The rolled strip will go on a dremel and get rounded off to make that ball joint.
 
Absolutely fantastic and stunning work! :)

Silver, you have not "unlearned" anything! This is top-notch quality. Carry on, please! :)
 
Absolutely fantastic and stunning work! :)

Silver, you have not "unlearned" anything! This is top-notch quality. Carry on, please! :)


Thanks for your kind words. As usual, my build techniques are a bit different but the results is what matters.


So here is the next set in the build technique.

038.jpg


039.jpg


040.jpg


041.jpg


042.jpg


The ends of the Hydraulics are small cut pieces of paper rods from and ear swab.
 
Thanks for all of the likes. I am pleased that you have looked in and enjoyed my build thread.


And so the build thread continues. The foot pad template has added tabs which are to be folded underneath the pad template. A wrapped cylinder is made to fit the ball joint. This will allow for better posing . The plans have this section cut at an angle and it would have to be exact to place the legs on the foot pad. With the ball joint, you can place the legs into different poses.


043.jpg


044.jpg


045.jpg


046.jpg


047.jpg
 
This is really looking good!!!

that's really cool!! for some reason I think of silent running bots, heuy duey and louie

Thanks for looking in and for your comments. As for the silent running bots, the boxy shape is reminiscent of the bots.


The pads are constructed a bit differently from the plans. The ball joint is better suited for posing the dreadnaught. Not only that, but is more sturdy for constant handling. The hip and leg section is the weakest part of the model. Because of this, I made sure that it is very strong.


048.jpg


049.jpg


050.jpg


051.jpg


052.jpg