The Eiffel Project
- Thread starter Tonino
- Start date
You are using an out of date browser. It may not display this or other websites correctly.
You should upgrade or use an alternative browser.
You should upgrade or use an alternative browser.
- Apr 5, 2013
- 14,202
- 10,820
I wouldn't go to France with this model, they might not you leave with it. 
Very nice and detailed parts.
Totally worth the hours you put into Sir, the results speak for themselves....
and you haven't even start putting it together
Totally worth the hours you put into Sir, the results speak for themselves....
and you haven't even start putting it together
This looks fantastic Thank you for taking is with your thoughts.
Thanks to all of you, my friends, your appreciation is a wonderful fuel to ignite my enthusiasm.
The colouring process of the first batch of pieces, to build the first stage, is completed. To help me in the painting work, that I performed using spray cans, I realized a little supporting device. My first attempt finished in a disastrous ripping of several parts who were pasted by the paint to the surface where I placed the part. This support keeps the piece lifted with minimal contact surface with the bottom of it.
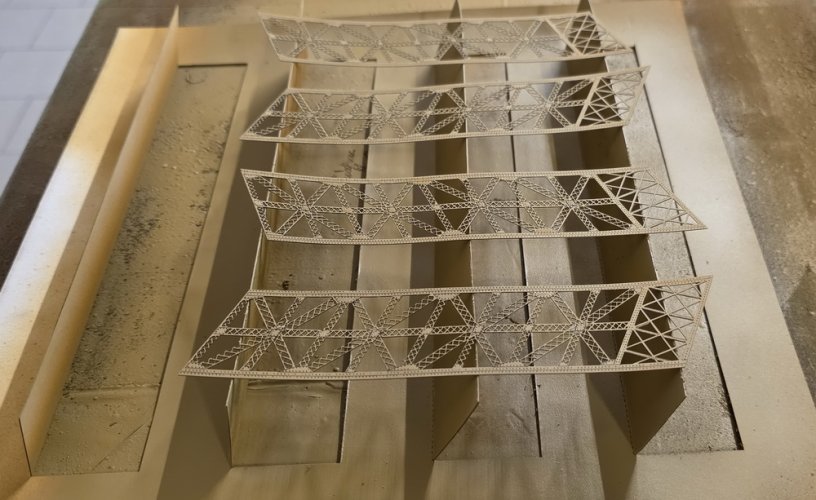
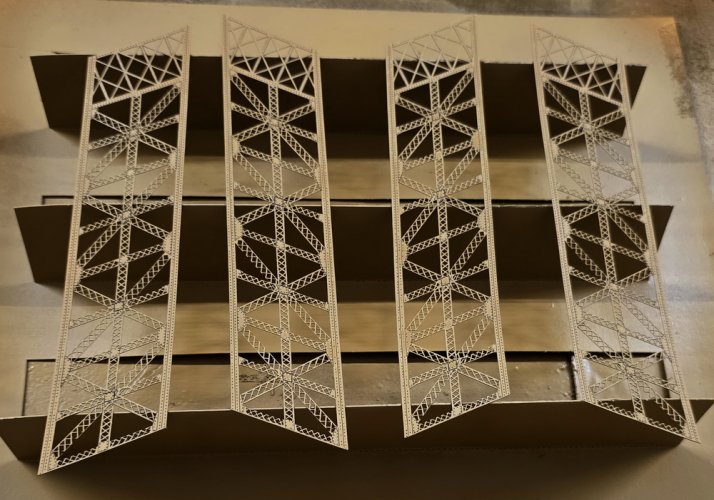
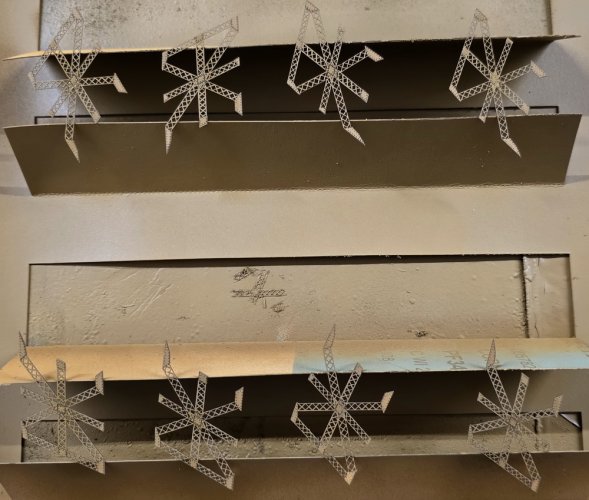
Even the littlest pieces are easily kept in place during painting process. In the center of the next image you can see the result of my first attempt without the supporting device...
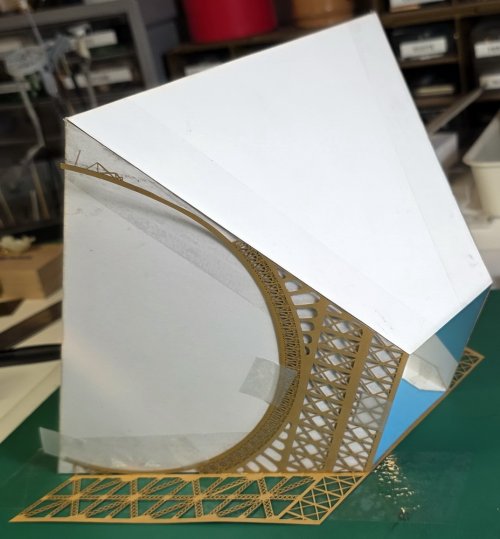
Now we can start with the first very dangerous task. Joining those parts along the edges giving to them enough strenght to hold the weight of the finished model is not an easy enterprise. First of all I had to find a way to keep the pieces in the exact position while adding glue and during setting. I realized a form with shape and dimensions identical to the internal volume of the base. Fixing the parts with tape to it is a good way to keep them in position exactly. I added some plastic tape along the edges of this sort of pyramid to prevent the glue to adhere to the forming shape. It worked very well.
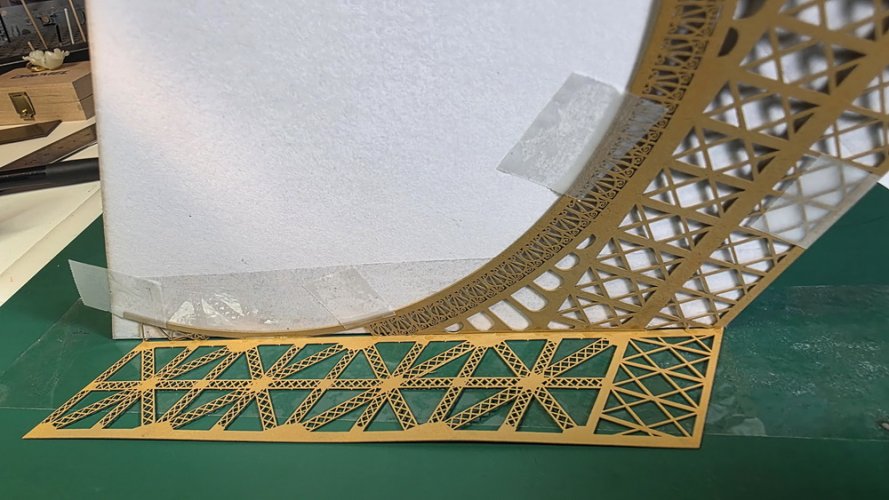
With a very fine pipette I added CA glue along the line where the parts touch themselves. Once hardened this make a strong support to the structure.
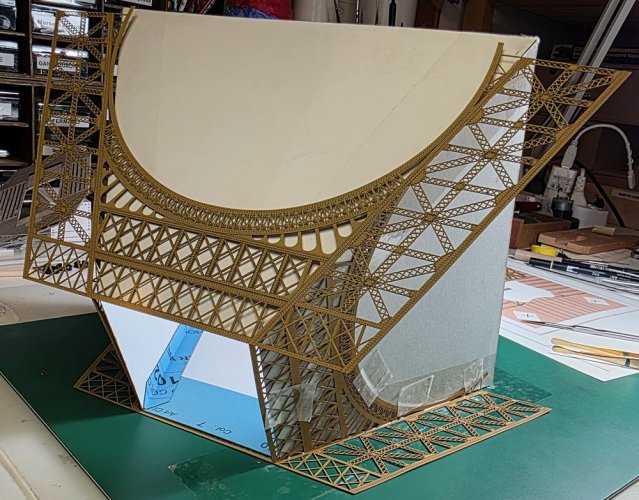
With the fourth inner part I completed the first closed structure and can have an idea about:
1) the correct way to use CA glue to join edges of this kind of construction
2) how strong is the whole structure once the parts are joined to form a complete cage.
I was pretty worried about this first glueing experiment but now I feel somewhat encouraged: I can do it!
And placing this first batch of pieces on the printed lower side of the first floor platform... I can evaluate how good the fitting is... not bad this far...
The colouring process of the first batch of pieces, to build the first stage, is completed. To help me in the painting work, that I performed using spray cans, I realized a little supporting device. My first attempt finished in a disastrous ripping of several parts who were pasted by the paint to the surface where I placed the part. This support keeps the piece lifted with minimal contact surface with the bottom of it.


Even the littlest pieces are easily kept in place during painting process. In the center of the next image you can see the result of my first attempt without the supporting device...

Now we can start with the first very dangerous task. Joining those parts along the edges giving to them enough strenght to hold the weight of the finished model is not an easy enterprise. First of all I had to find a way to keep the pieces in the exact position while adding glue and during setting. I realized a form with shape and dimensions identical to the internal volume of the base. Fixing the parts with tape to it is a good way to keep them in position exactly. I added some plastic tape along the edges of this sort of pyramid to prevent the glue to adhere to the forming shape. It worked very well.


With a very fine pipette I added CA glue along the line where the parts touch themselves. Once hardened this make a strong support to the structure.

With the fourth inner part I completed the first closed structure and can have an idea about:
1) the correct way to use CA glue to join edges of this kind of construction
2) how strong is the whole structure once the parts are joined to form a complete cage.
I was pretty worried about this first glueing experiment but now I feel somewhat encouraged: I can do it!
And placing this first batch of pieces on the printed lower side of the first floor platform... I can evaluate how good the fitting is... not bad this far...

A masterpiece in the making! Great seeing how this is coming together!Thanks to all of you, my friends, your appreciation is a wonderful fuel to ignite my enthusiasm.
The colouring process of the first batch of pieces, to build the first stage, is completed. To help me in the painting work, that I performed using spray cans, I realized a little supporting device. My first attempt finished in a disastrous ripping of several parts who were pasted by the paint to the surface where I placed the part. This support keeps the piece lifted with minimal contact surface with the bottom of it.
View attachment 228118
View attachment 228119
Even the littlest pieces are easily kept in place during painting process. In the center of the next image you can see the result of my first attempt without the supporting device...
View attachment 228120
Now we can start with the first very dangerous task. Joining those parts along the edges giving to them enough strenght to hold the weight of the finished model is not an easy enterprise. First of all I had to find a way to keep the pieces in the exact position while adding glue and during setting. I realized a form with shape and dimensions identical to the internal volume of the base. Fixing the parts with tape to it is a good way to keep them in position exactly. I added some plastic tape along the edges of this sort of pyramid to prevent the glue to adhere to the forming shape. It worked very well.
View attachment 228121
View attachment 228122
With a very fine pipette I added CA glue along the line where the parts touch themselves. Once hardened this make a strong support to the structure.
View attachment 228123
With the fourth inner part I completed the first closed structure and can have an idea about:
1) the correct way to use CA glue to join edges of this kind of construction
2) how strong is the whole structure once the parts are joined to form a complete cage.
I was pretty worried about this first glueing experiment but now I feel somewhat encouraged: I can do it!
And placing this first batch of pieces on the printed lower side of the first floor platform... I can evaluate how good the fitting is... not bad this far...
View attachment 228124
Here I am after some days in bed accompained by a nice covid, back to work and preparing to do the BIG join...
If anyone of you was wondering what are those little pieces for, maybe some test part to determine the right parameters to send to the laser cut?
Really they are actual pieces and has to be placed in an exact spot.
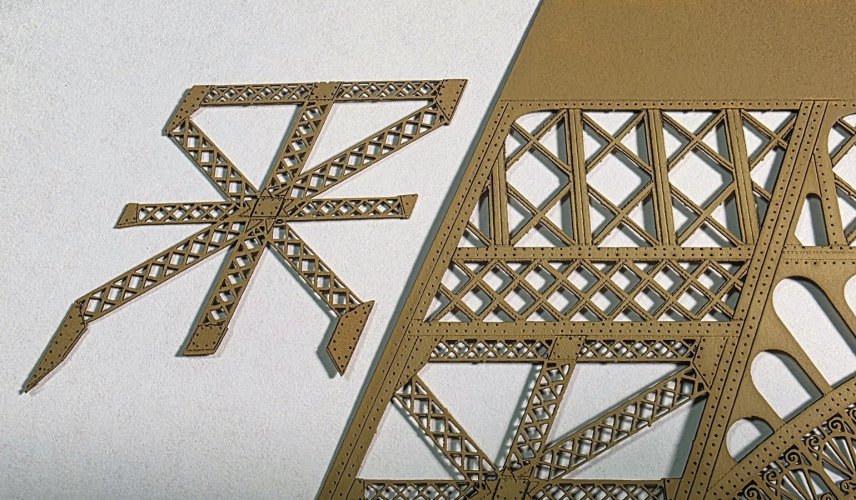
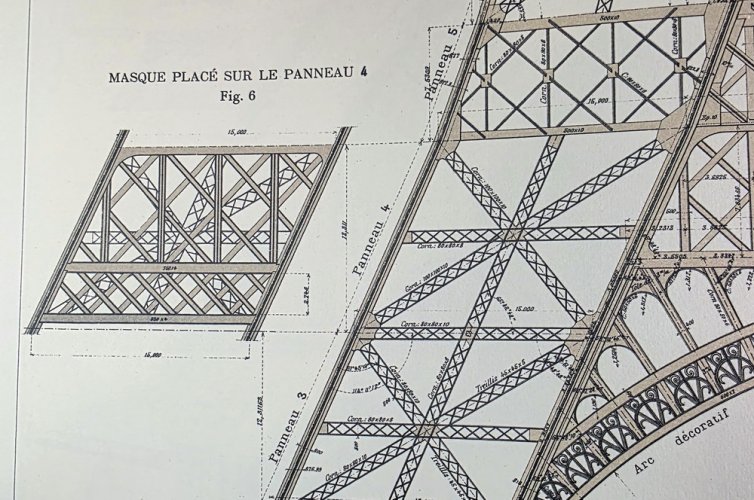
If you take a look at the original plans you see that, in the 4th panel of the main leg, there is a "masque", a structure placed over the frame that covers it and you can see the thinner frame through the apertures in the external one.
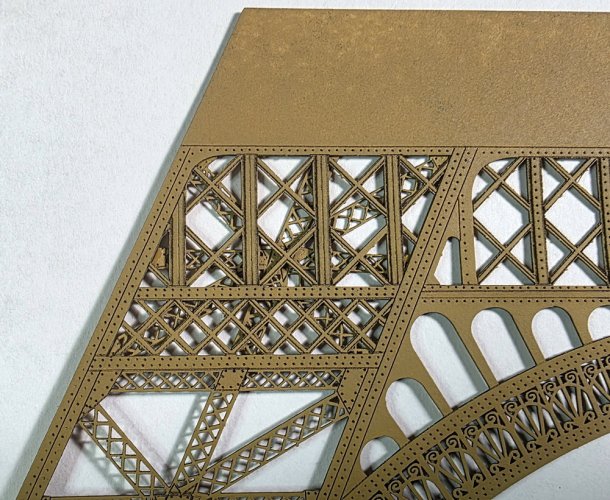
Placing the little frame behind the main part you achieve a very satisfying "see through" effect very realistic.
And now, to afford the external sides mounting, I need to realize a device to help me keeping the pieces in the exact position while the glue is setting.
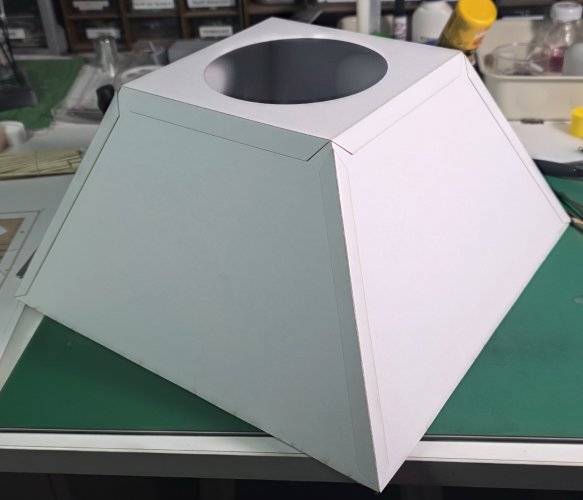
This time the mask is external because it has to contain the whole first level of the frame.
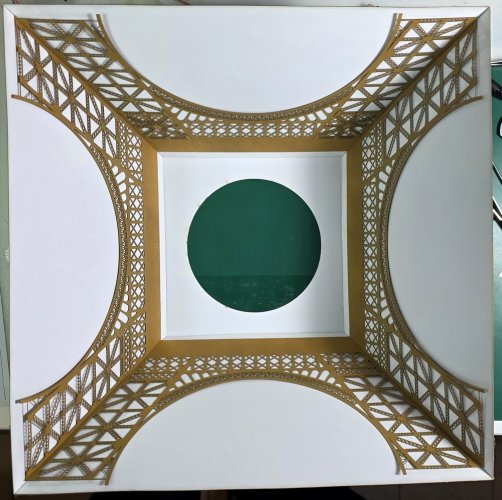
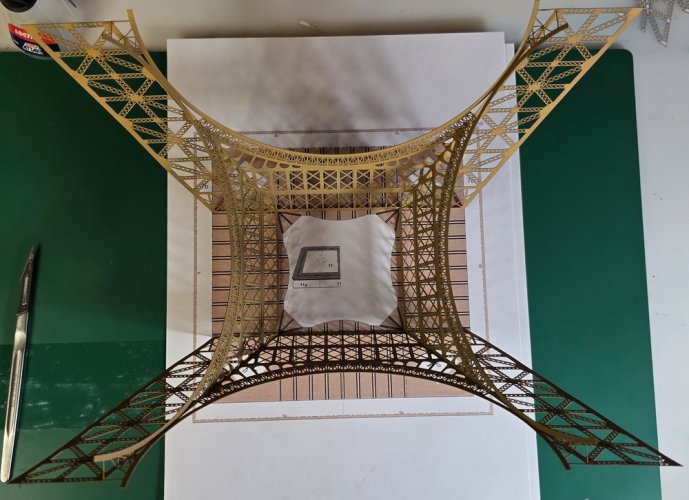
Here you can see the four main parts of the external frame. Inside the pyramid the edges are kept in position at 90° edge to edge. Here they are just placed in place as a test. Along the internal walls of the white cardboard I placed plastic tape to prevent, as before, the glue to adhere to the forming shape.
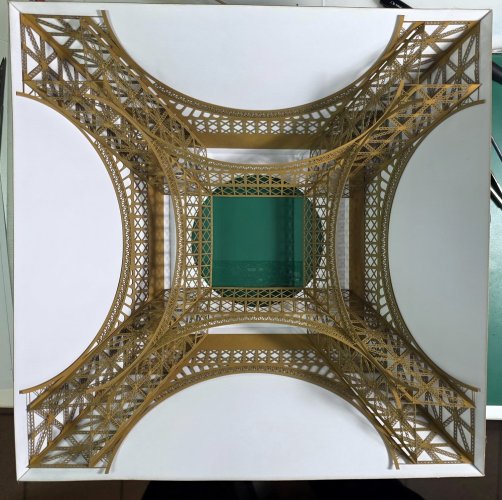
Subsequently, the forming shape will help to join the internal structure, already finished, to the external one . This will be a more complicated phase but I will study something to achieve all the right angles... But this "dry test" seems to be promising
This is all for today, see you soon...
If anyone of you was wondering what are those little pieces for, maybe some test part to determine the right parameters to send to the laser cut?
Really they are actual pieces and has to be placed in an exact spot.

If you take a look at the original plans you see that, in the 4th panel of the main leg, there is a "masque", a structure placed over the frame that covers it and you can see the thinner frame through the apertures in the external one.

Placing the little frame behind the main part you achieve a very satisfying "see through" effect very realistic.

And now, to afford the external sides mounting, I need to realize a device to help me keeping the pieces in the exact position while the glue is setting.

This time the mask is external because it has to contain the whole first level of the frame.

Here you can see the four main parts of the external frame. Inside the pyramid the edges are kept in position at 90° edge to edge. Here they are just placed in place as a test. Along the internal walls of the white cardboard I placed plastic tape to prevent, as before, the glue to adhere to the forming shape.

Subsequently, the forming shape will help to join the internal structure, already finished, to the external one . This will be a more complicated phase but I will study something to achieve all the right angles... But this "dry test" seems to be promising
This is all for today, see you soon...
You are making GREAT PROGRESS on this project! I like the "forming rig" that you are using to help with holding the base together whilst you are assembling it.
Thanks Chris, I was just wondering how to call that thing, you gave me a good word to define it!
You are more than welcome, my friend!Thanks Chris, I was just wondering how to call that thing, you gave me a good word to define it!
KEEP UP THE GREAT WORK!!!
This model should probably be put in the engineering department at L'Ecole Polytechnique or in The Louvre. Amazing work!Here I am after some days in bed accompained by a nice covid, back to work and preparing to do the BIG join...
If anyone of you was wondering what are those little pieces for, maybe some test part to determine the right parameters to send to the laser cut?
Really they are actual pieces and has to be placed in an exact spot.
View attachment 228227
If you take a look at the original plans you see that, in the 4th panel of the main leg, there is a "masque", a structure placed over the frame that covers it and you can see the thinner frame through the apertures in the external one.
View attachment 228228
Placing the little frame behind the main part you achieve a very satisfying "see through" effect very realistic.
View attachment 228229
And now, to afford the external sides mounting, I need to realize a device to help me keeping the pieces in the exact position while the glue is setting.
View attachment 228230
This time the mask is external because it has to contain the whole first level of the frame.
View attachment 228231
Here you can see the four main parts of the external frame. Inside the pyramid the edges are kept in position at 90° edge to edge. Here they are just placed in place as a test. Along the internal walls of the white cardboard I placed plastic tape to prevent, as before, the glue to adhere to the forming shape.
View attachment 228232
Subsequently, the forming shape will help to join the internal structure, already finished, to the external one . This will be a more complicated phase but I will study something to achieve all the right angles... But this "dry test" seems to be promising
This is all for today, see you soon...


A very satisfying update - I see a few weeks back the real thing was closed as temperatures were too hot for people to go up the tower!
